Instructions for hookah Fortune
-
Assembly instructions
-
User manual
-
Warranty
Instructions for assembling hookah Fortune
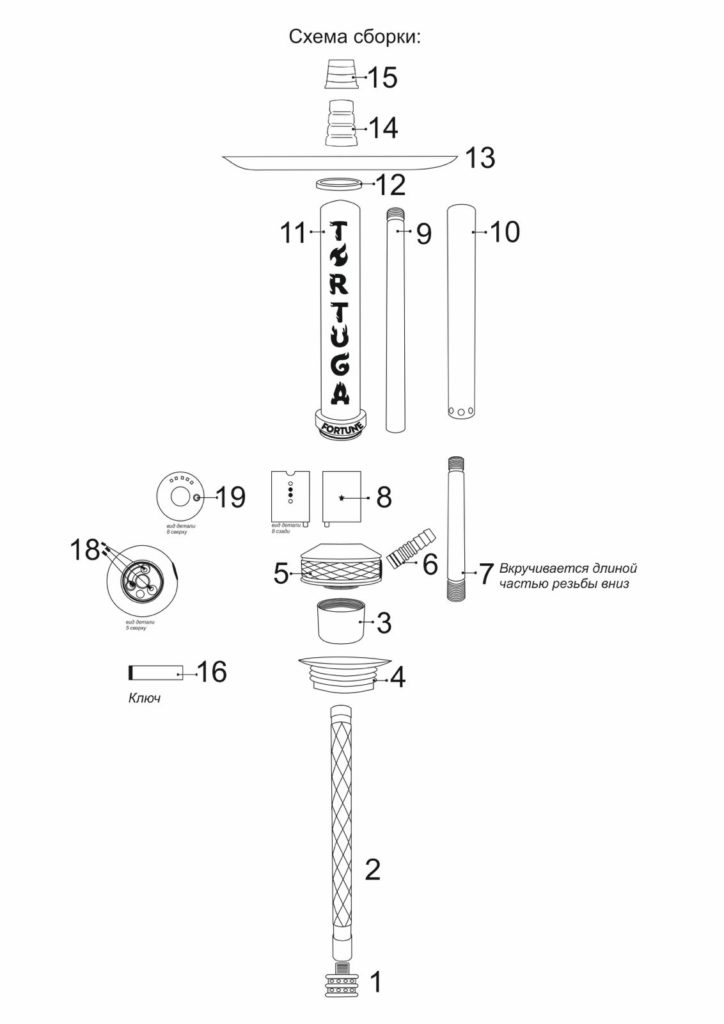
Set:
- Diffuser;
- The lower part of the pipe;
- Base ring;
- Vase seal;
- Base;
- Hose connector;
- The middle part of the pipe;
- Display block;
- Upper part of the pipe;
- Diffuser;
- Decorative overlay;
- Сentering ring;
- Tray;
- Bowl connector;
- Bowl seal;
- Magnetic key;
- Blowing balls;
- Light indication ball.
Before the first use, be sure to rinse all parts and accessories of the hookah. We recommend that you clean all holes and threaded connections with a brush using baking soda; Rinse the vase and hose with running water.
Start collecting the hookah should be from the bottom and move up.
- A diffuser (detail 1) is screwed into the lower part of the pipe (detail 2). Screw on the base ring
(part 3) on the base (part 5). Then align the resulting parts with each other, as shown in the assembly diagram. - Screw a part of the pipe (part 7) into the base (part 5). Item 7 is screwed into the base with a long part of the thread (item 5). Then place three blow balls (piece 17) into the base (piece 5).
3. Install the display unit (part 8) into the base (part 5). Insert until a characteristic click. - Screw the upper part of the pipe (part 9) into the middle part of the pipe (part 7).
- Place the bulb of the light indication into hole 19 in the indication block (item 8). Then put the diffuser (item 10) on (item 9) the upper part of the pipe.
- Install the decorative stem sleeve (detail 11) on the diffuser (part 10) until a characteristic click. Then install the centering ring (part 12) into a decorative overlay (detail 11). Place the tray (detail 13) on the centering ring (part 12). Then screw on the bowl connector (detail 14) on the upper part of the pipe (detail 9)
- Slide the rubber band (item 15) onto the bowl connector (item 14) as shown in the assembly diagram.
- Insert the hose connector (item 6) into the base of the hookah (item 5).
Turning the display unit on and off:
- Bring the magnetic key (part 16) to the platform on the display unit (part 8).
- To turn off, repeat steps 1.
Happy using!
Hookah Fortuna instruction manual
Display block indicators:
- Dark red light – is charging the battery.
- Green light – battery is charged and ready to use.
The product battery is recharged from a 220V network. The charger plug is inserted into the mains socket after the magnetic connector is installed on the contacts on the cylindrical surface of the product.
After that, the logo will light up for the entire time of charging with a weak red light. After the charging process is completed, the backlight color will change to green. The charger is turned off in the reverse order of turning it on.
It is recommended that after each session of smoking a hookah, wipe the channel for a small ball with a cotton swab, after removing the ball from the hookah.
- Housing deformation is not allowed;
- The application of shock influences is not allowed;
- After 8 hours of operation, the product must be washed with clean water (weakly alkaline products are allowed);
- The hookah light has 2 phases.
IMPORTANT!!! To make the hookah last as long as possible, we recommend rinsing the hookah pipe with running water after each smoking session; wash all holes and threaded connections no more than once a month with daily smoking; dry the hookah well after washing.
The product is not collapsible and cannot be repaired!
Hookah Fortune warranty
This model has been thoroughly tested before mass production. All prefabricated elements pass through the technical control department before packing and shipping. Nonetheless
If you have any questions about the quality or packaging of products upon receipt, please contact us within 48 hours.
To return or exchange an item, you must:
- describe the nature of the damage or defect;
- take high-quality photographs reflecting damage or defect;
- send photos indicating the date and place of purchase of products by Email: info.tortugarussia@gmail.com.
We also provide free warranty service for 6 months from the date of purchase.
IMPORTANT!!! The warranty only covers non-mechanical damage and manufacturing defects.
Any independent modifications; use not provided for by the properties of this product; careless operation (mechanical damage); incorrect transportation and/or storage will void the warranty.
If you have any questions, please contact us by choosing a convenient method on the Contacts page.

